- Varieties of cracks and what provokes them
- Vertical cracks
- What means are used to seal cracks in the walls
- How to get rid of cracks forever: the rules of caulking forever
- The most effective way to seal cracks: is epoxy injection
- Facade Trim
If you notice cracks in outside walls, it can be a real problem because they not only spoil the appearance of the building but can also indicate profound structural changes. In addition, cracks are what spoil the waterproofing of outside walls because water can get inside the wall and the building itself through them. In the worst situation, they can lead to severe problems in the structure of the building. In this article, we will go deeper into the question of what cracks are and how to deal with them.
Varieties of cracks and what provokes them
Before you perform exterior wall crack repair, it is worth understanding the main varieties of these defects and why they appear. Cracks can occur for several reasons:
- Settlement of the house or expansion/contraction of building materials under the influence of the environment.
- Movement of the foundation of the structure. In this situation, it is worth determining what provoked this to understand how the waterproofing walls exterior can be repaired.
- Natural processes. In this situation, it is not worth worrying about. But other more severe problems may put waterproofing exterior cinder block walls at serious risk.
Vertical cracks
This crack often occurs in the foundation walls, which lack quality support. The main reason there is insufficient support is that the soil under the base of the building is rather poorly compacted and can shrink under load or even be washed away by groundwater.
Stepped cracks
The cause of step cracks in mortar joints in the area of corners of buildings. They are most often caused by the movement of the walls due to shifts in the foundation of the building, particularly foundation subsidence.
Horizontal cracks
The main reason for the appearance of horizontal cracks is the corrosion of wall ties. But this situation is not a reason for despair. Modern specialists can replace corroded connections in the walls and fix the problem without significant damage to homeowners.
What means are used to seal cracks in the walls
A variety of compounds can be used to seal cracks. On sale, you can find complete sets of spiral rods, special mortar, a spatula for mixing the components, and a gun for delivering the mortar with various nozzles, trowels and other details. You need to know precisely what you need and be able to use the kit at all stages of sealing defects on the wall’s surface.
How to get rid of cracks forever: the rules of caulking forever
Sealing exterior wall cracks may be required on surfaces in the house of various materials. Most often, the repair is needed on the following types of walls.
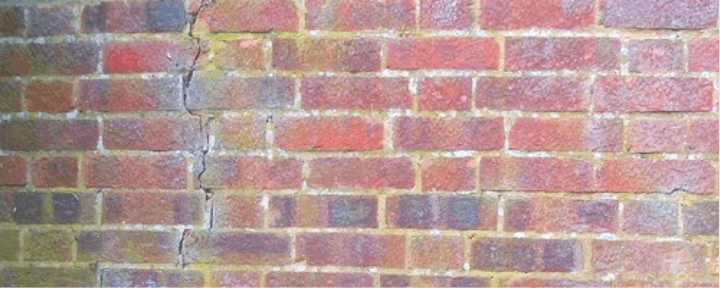
Sealing cracks in a brick wall
If you want to remove a crack on the surface of a brick wall, you first need to remove the cracked mortar. In this situation, you should use a special scraper. At the same time, it is worth not damaging the bricks themselves. In this situation, you should use a chisel and hammer during the work.
After removing the mortar, the brick wall should be sprayed with water. After that, a new mortar is applied to the joints. Next, it is worth using water on the brick wall again to smooth out the applied mortar.
The process of sealing cracks in a concrete wall
Sealing concrete walls outside involves an excellent surface. Sealing cracks in concrete walls can be done with a liquid or paste-like elastomeric substance. It must be applied to the crack from a special tank or pressed into the defect with a spatula.
You should use latex-based paint if the crack is small – 1/2 inch wide and 1/4 inch deep. It is a relatively simple method of exterior waterproofing solutions, which you can do yourself. The primary purpose of these actions is to prevent water from seeping through the walls. In addition, this method will minimize the likelihood of the edges of the crack chipping and cracking the defect.
In addition, structural sealing of concrete cracks in the walls also occurs with the help of epoxy resin injections.
The most effective way to seal cracks: is epoxy injection
The best waterproofing for exterior walls is to fill cracks with an infusion of a particular substance based on epoxy resin. This method of sealing cracks involves the following steps.
Step 1: Clean the work area
First, it is worth removing the remains of concrete mortar from the crack and painting or cleaning it from the old putty. For this process, it is worth using a wire brush. After that, you should use a vacuum cleaner to remove debris and dust.
Step 2: Align the injection points with nails
The next step is to hammer in 3-inch finish nails (10d) 12 inches apart. These will align the mortar injection points along the crack.
Step 3: Prepare the crack-sealing material
After that, you need to prepare water seal for the exterior walls. To do this, open two containers of epoxy crack sealant and fill equal amounts of A and B compounds. It is worth using two different sticks to avoid contaminating the containers with the compositions. In this situation, mixing the two parts on a particular board using a clean putty knife is worth mixing. It is necessary to mix until there is a homogeneous grey colour in the mixture.
Step 4: Apply the sealant to the base
For the exterior block wall waterproofing to be done as well as possible, you need to apply a small amount of sealant to the base of one of the plastic injection ports, making sure not to plug the hole itself. After that, you need to put the port on one of the nails peeking out of the crack. Then it would help if you pressed them to the wall. A similar principle should be done with the other ports.
Step 5: Mix the epoxy sealant and apply it
After mixing some epoxy sealant, you should apply it to the surface of the entire crack using a putty knife. It should be ½ inch wide. You should then spread the sealant on each side of the crack by 1/8 inch and 1 inch. Next, you should cover the cracks with sealant over the surface of the entire flange, leaving only the wide part of the neck. Next, you should take a brush to work the edges and soak it in mineral spirits.
If you can look, look at the back of the wall. If the crack is through, you should also treat it with sealant there. It should then cure for 6-10 hours before injecting the epoxy.
Step 6: Treat the crack with epoxy
Using the tanking systems for external walls, you should mix the LCR epoxy using the plunger piston from the kit. After that, place the LCR cartridge in the gun to inject the mortar. Apply the mortar into the crack, moving from the bottom to the top.
Step 7: Fill the joints all the way
Squeeze the trigger repeatedly until the epoxy comes out of the hole. Next, it’s worth removing the gun and plugging in the newly filled port. Then put the tip of the cartridge in the spot that is leaking and pull the gun’s trigger, filling it with epoxy. It should be done with all the ports.
Step 8: Smooth the ports
The mortar should be left to dry for five days. Next, it is worth cutting off the necks with a hacksaw. You can also patch these cut-off ports with crack sealant.
Facade Trim
If you are faced with cracks appearing on the structure’s facade, waterproofing the house’s exterior walls does not suffer. If the problem is in the finishing, it is enough to patch up the defects with plaster and other materials for finishing the facade. If the problem is more profound and concerns the structural changes in the building, you should take more responsibility for the defect elimination process.
Suppose you need quality waterproofing exterior crawl space walls and other rooms in the house. In that case, you should contact real professionals who will carefully inspect the home and fix all the defects.


